Agfa Record iii Review

For such an old and small camera it is capable of producing fantastic image quality when stopped down. 1/250s 105mm F16 Ilford HP5+.
A couple of years ago I came into possession of a Kodak pocket camera, something I’ve written about on this blog previously. Once upon a time folding cameras were the portable everyman camera that were easy to use given their very limited features. Eventually they fell out of favour to the fixed body cameras we are more familiar with today, but they continued to be popular and became more advanced up until the 1950s. Like many folders my Kodak pocket camera had some major foibles due to age and its hand-built nature and these limitations had really started to bug me. I’d come around to shooting 6x9 medium format again, but I wanted a camera that I could actually shoot handheld. At one point I did consider a Fuji GW690, an excellent fixed lens camera that is gaining in popularity. However ultimately it proved too bulky and expensive. Enter the Agfa Record iii.

Shooting this camera handheld proved to be challenging but with good technique and using higher ISO films you can create great results without a tripod. 1/250s 105mm F11 Kodak Tri-X.
Why did I buy this camera?
The earlier days of photography saw a much greater range of camera manufacturers, often copying each other, helped by the simple mechanics of what they were making. As mentioned, I wanted a folding camera I could handhold and that meant shutter speeds going up to at least 1/250s, a lens that didn’t require shooting at F22 to get both acceptable image quality and a useable depth of field and critically a rangefinder not just a viewfinder. I looked at the Zeiss Super Ikonta but ultimately chose the Agfa Record iii as I preferred the design of the top plate and the fact that the rangefinder doesn’t fold out. Less to go wrong in my view. It’s worth mentioning though that the rangefinder on the Agfa is uncoupled (compared to the Zeiss which is coupled), meaning you have to dial focus onto the lens separately.

Monochrome works well with subjects with strong form and shape. As of writing this blog I had yet to see an colour results from this camera. 1/100s 105mm F11 Kodak Tri-X.
I then had to choose which lens model I wanted, the cheaper Apotar or the more expensive and much rare Solinar (there was also an even cheaper Agnar lens for the lower tier Record and Record ii cameras). The Apotar is a triplet design whereas the Solinar is a Tessar design similar to that of the Zeiss. After seeing a test of the two lens designs on the Isolette, the 6x6 equivalent, and an in depth image review of the Solinar, I decided to be patient and wait for a camera with the better lens. Ultimately, I paid quite a bit to buy a mint condition one from France with ‘new’ bellows. A bold decision but sometimes it’s just better to get the best you can afford.

The top end Agfa Record iii with the Tessar design Solinar lens and Synchro-Compur shutter that goes all the way to 1/500s.

When folded this camera is easy to carry around. Note the handle on the right hand side.
The Camera
So what is the feature set of this camera? The lens is a 105mm F4.5 (roughly equivalent to 50mm in 35mm terms) with the apertures stopping down all the way to F32. Cheaper models had a Prontor SV shutter that tapped out at 1/250s, but this top end model had a better Synchro Compur shutter that goes all the way to 1/500s. It’s very similar to that found on a large format camera lens of the same era, it even requires manually cocking before each shot. There is a B mode but surprisingly no T mode which makes a cable release with a locking mechanism absolutely essentially for long exposures. A cold shoe sits on top of the camera and flash is synched at all speeds with a traditional sync cable. It has a shutter button on the camera body itself and next to that is large dial to calculate your depth of field based on your chosen aperture when focusing. That comes in really handy, especially when setting up a shot.

A close-up of the controls on the lens.

Looking at the lower spec model with the Prontor-SV shutter and Apotar lens, you can see the screw mount for the shutter release cable on the left hand side of the lens. This is strangely missing on the higher end model which means it is not easy to bypass the double exposure mechanism.
However, all cameras from this era have at least one strange quirk and for this camera it is the double exposure mechanism. Once you take a shot you have to wind on the film to reset the mechanism before you can fire again. But this where the camera really shows it’s age. While at first glance it behaves like a modern camera all the controls including the shutter release are actually on the lens. The shutter release button on the body is in fact an awkward set of levers that triggers the shutter lever on the lens, and this is where problems can occur.

A close-up view of the top plate. From top to Bottom: film wind-on dial, bellows release button, cold shoe, rangefinder dial, shutter release (body), depth of field calculator dial. The red dot behind the shutter button signifies that the double exposure mechanism is activated and you need to wind on the film to be able to shoot again. This will become white when the system is deactivated.
The double exposure lock only triggers when the body release is pressed but it is possible to trigger it without firing the shutter if you press too hard while also having forgotten to manually cock the shutter on the lens itself. If this occurs you either have to wind on and lose the shot (painful and expensive when you only get eight shots on a roll) or even more awkwardly take the shot using the lens release. This is actually the one area where the cheaper Record iii with the Pronto SV shutter is actually better. Not only does the cheaper shutter have a longer lens release lever but it also has a screw mount for a cable release directly on the lens as well as the body release. This means you can completely bypass the double exposure mechanism. This is completely missing on the higher end Synchro-Compur shutter and it is a real mystery as to why. You can see if the system has been triggered by observing the small dot behind the body release. If it’s red you need to wind on and if it’s white you are ready to take another shot.

Rear of the camera which shows the orange film window to check your frame number. There is an internal cover that is lifted by the lever to prevent light leaks but it is not fully effective when shooting films of ISO 200 or higher in bright sunlight.
If you want to mount the camera on the tripod, then you need not worry about adapters as it has a standard ¼-20 socket for landscape orientation but unlike by Kodak pocket camera there is not a second mounting socket for shooting in portrait. You’ll have to rotate the camera on your ball head to do that, though it does have a small flick out kick stand for this orientation which can be handy if you can rest the camera on a flat surface. However I have found that some modern mounting plates don’t sit flush with this camera meaning you need a bit an extra material like tape in order to properly secure it.

To combat this I cover the window with black electrical tape.
Sadly, the lens doesn’t have any filter threads for modern screw-in filters. As with many cameras from that era they instead use push on filters, in this case 37mm, which are still possible to come by second hand, though I don’t own any. There also people online who have cut up old filters and glued them to a modern filter adapter ring to allow you to use screw-on filters. Again, it’s not something I have used but it is something I am considering for the future.

A classic MG Midget outside of Ace café, subject matter that was probably typical during the cameras lifetime. 1/100s 105mm F16 Ilford HP5+.
Shooting with the Agfa Record iii
With that all said and done, what is it like to actually shoot with this camera? First of all the fit and finish is good, it doesn’t feel cheap and nasty in the hand. However, what I’ve learned is that is takes a while to adjust to the balance of the unfolded camera in the hand. With a good enough technique, you can shoot all the way down to 1/25s and get sharp results but with bad technique you can actually ruin shots at 1/100s with camera shake.

Construction work near Ace café. If you look on the right hand side you can the results of a light leak as I wasn’t yet using electrical tape to cover the film window. 1/250s 105mm F16 Ilford HP5+.
Folding cameras are not very heavy which means there is a lack on inertia to absorb the wobbles in your hand. What weight there is, is also not well balanced so when you push the body release I’ve found it’s very easy to tip the whole camera forward slightly which introduces shake. To overcome this, simply brace the camera by pressing it into your face while you look through the viewfinder, before gently pushing the shutter button. The viewfinder which also double as the rangefinder is large, clear and bright for a camera of this age, though naturally there have been times when I’ve dialled in the focus, only to then release I forgot to transfer that reading onto the lens itself, giving me an out of focus image. Regular practice will quickly iron out these issues.

I spotted these deep shadows at a train station that I knew would work well in monochrome. 1/100s 105mm F16 Kodak Tri-X.
Being a rangefinder camera you have to deal with the problem of parallax, the fact that what you see through the viewfinder and what the camera sees does not always match. Not an issue at infinity but the closer you are to your subject the worse the error gets. To remedy this, you either aim the camera slightly higher up when shooting in landscape or more to the left when shooting in portrait. However, I’ve always found I’ve needed relatively more correction when shooting in portrait mode which I imagine is to do with the design of the viewfinder. This is something you simply have to get used to with trial and error for each individual camera.

A good example of the issues judging parallax when shooting in portrait, even when dealing with subjects at distance. More correction than expected it often needed but you get used to it with enough practice. 1/100s 105mm F16 Kodak Tri-X.
To see your progression on the roll you look through the orange window on the back of the camera once you flip the lever up for the internal cover. However, I’ve learned the hard way that even with the cover in place the camera still suffers from small light leaks in direct sunlight. An external cover would have prevented this. Instead, I used a small piece of black electrical tape that I simply lift up before I wind on. I’m beginning to wonder whether the orange colour of the window is due to early films being orthochromatic, having a low sensitivity to red. Between that and the slow ISO speeds of the time, light leaks wouldn’t have been an issue. I’ve found it’s only with films of ISO 200 or higher that I run into issues.

It is possible to shoot handheld at 1/25s, but it does require very good technique. 1/25s 105mm F4.5 Kodak Tri-X Pushed to ISO 1600.
My camera also has an individual quirk that the image area is not exactly 6x9. I believe this is due to the replacement bellows installed by the previous owner. While they are of a higher quality compared to the originals (real leather as opposed to cheaper leatherette), they protrude slightly too far on one side internally to block a small part of the exposure. Though this is much preferable to having an old disintegrating set of leaky bellows.

Using the kickstand inside Kensington Palace where I wasn’t able to use a tripod. If you intend to use these frequently buying a bean bag may be a good idea so you can alter the angle of the camera. 30s 105mm F16 Kodak Tri-X.
Finally, just bear in mind that the film is loaded upside in the camera which can be a bit confusing when looking at the frame numbers during scanning. Just another quirk of an old camera you’ll have to get used to.

The lions at Trafalgar Square. With such a large piece of film grain is minimal even at higher ISOs. 1/100s 105mm F11 Fomapan 400.
Image Quality
At F11 – F22 the image quality is excellent to the point it even holds up favourably in comparison to my Bronica SQ-A, a camera several decades newer with much more modern glass. However, below F11 and especially below F8.0 the image quality can be disappointing. I find if I am shooting a subject up close in the centre of the frame the image quality wide open is good but switch to a subject at infinity and it completely falls apart. Yes you can argue that is simply a result of it being an old camera but given you are shooting such a large piece of film and you only have eight shots on a roll, it’s hard to justify in the modern era given the today’s cost of film. Here is where the Fuji GW690 would have shined.
Shooting wide open is not a good idea when shooting subjects at infinity but the centre is sharp enough for good image quality with a singular subject up close. The fall off of in image quality around the edge melts away in the bokeh. 1/250s 105mm F4.5 Ilford FP4+.

Image quality peaks at F22, you start to see issues with refraction at the smallest aperture F32. 1/50s 105mm F22 Kodak Tri-X.
However, using higher ISO films on a bright day which allowed me to shoot at F11 or F16, I have gotten some really good results handheld and given that large piece of film there isn’t a great deal of grain, especially compared to 35mm. Films like Ilford HP5+ or Kodak Tri-X really excel here and if you want to use something with a finer grain you can put the camera on a tripod and get truly excellent image quality stopped down, which let’s be honest, is what you will almost certainly be doing for landscape or cityscape photography. As ever it’s important to have the right expectations.
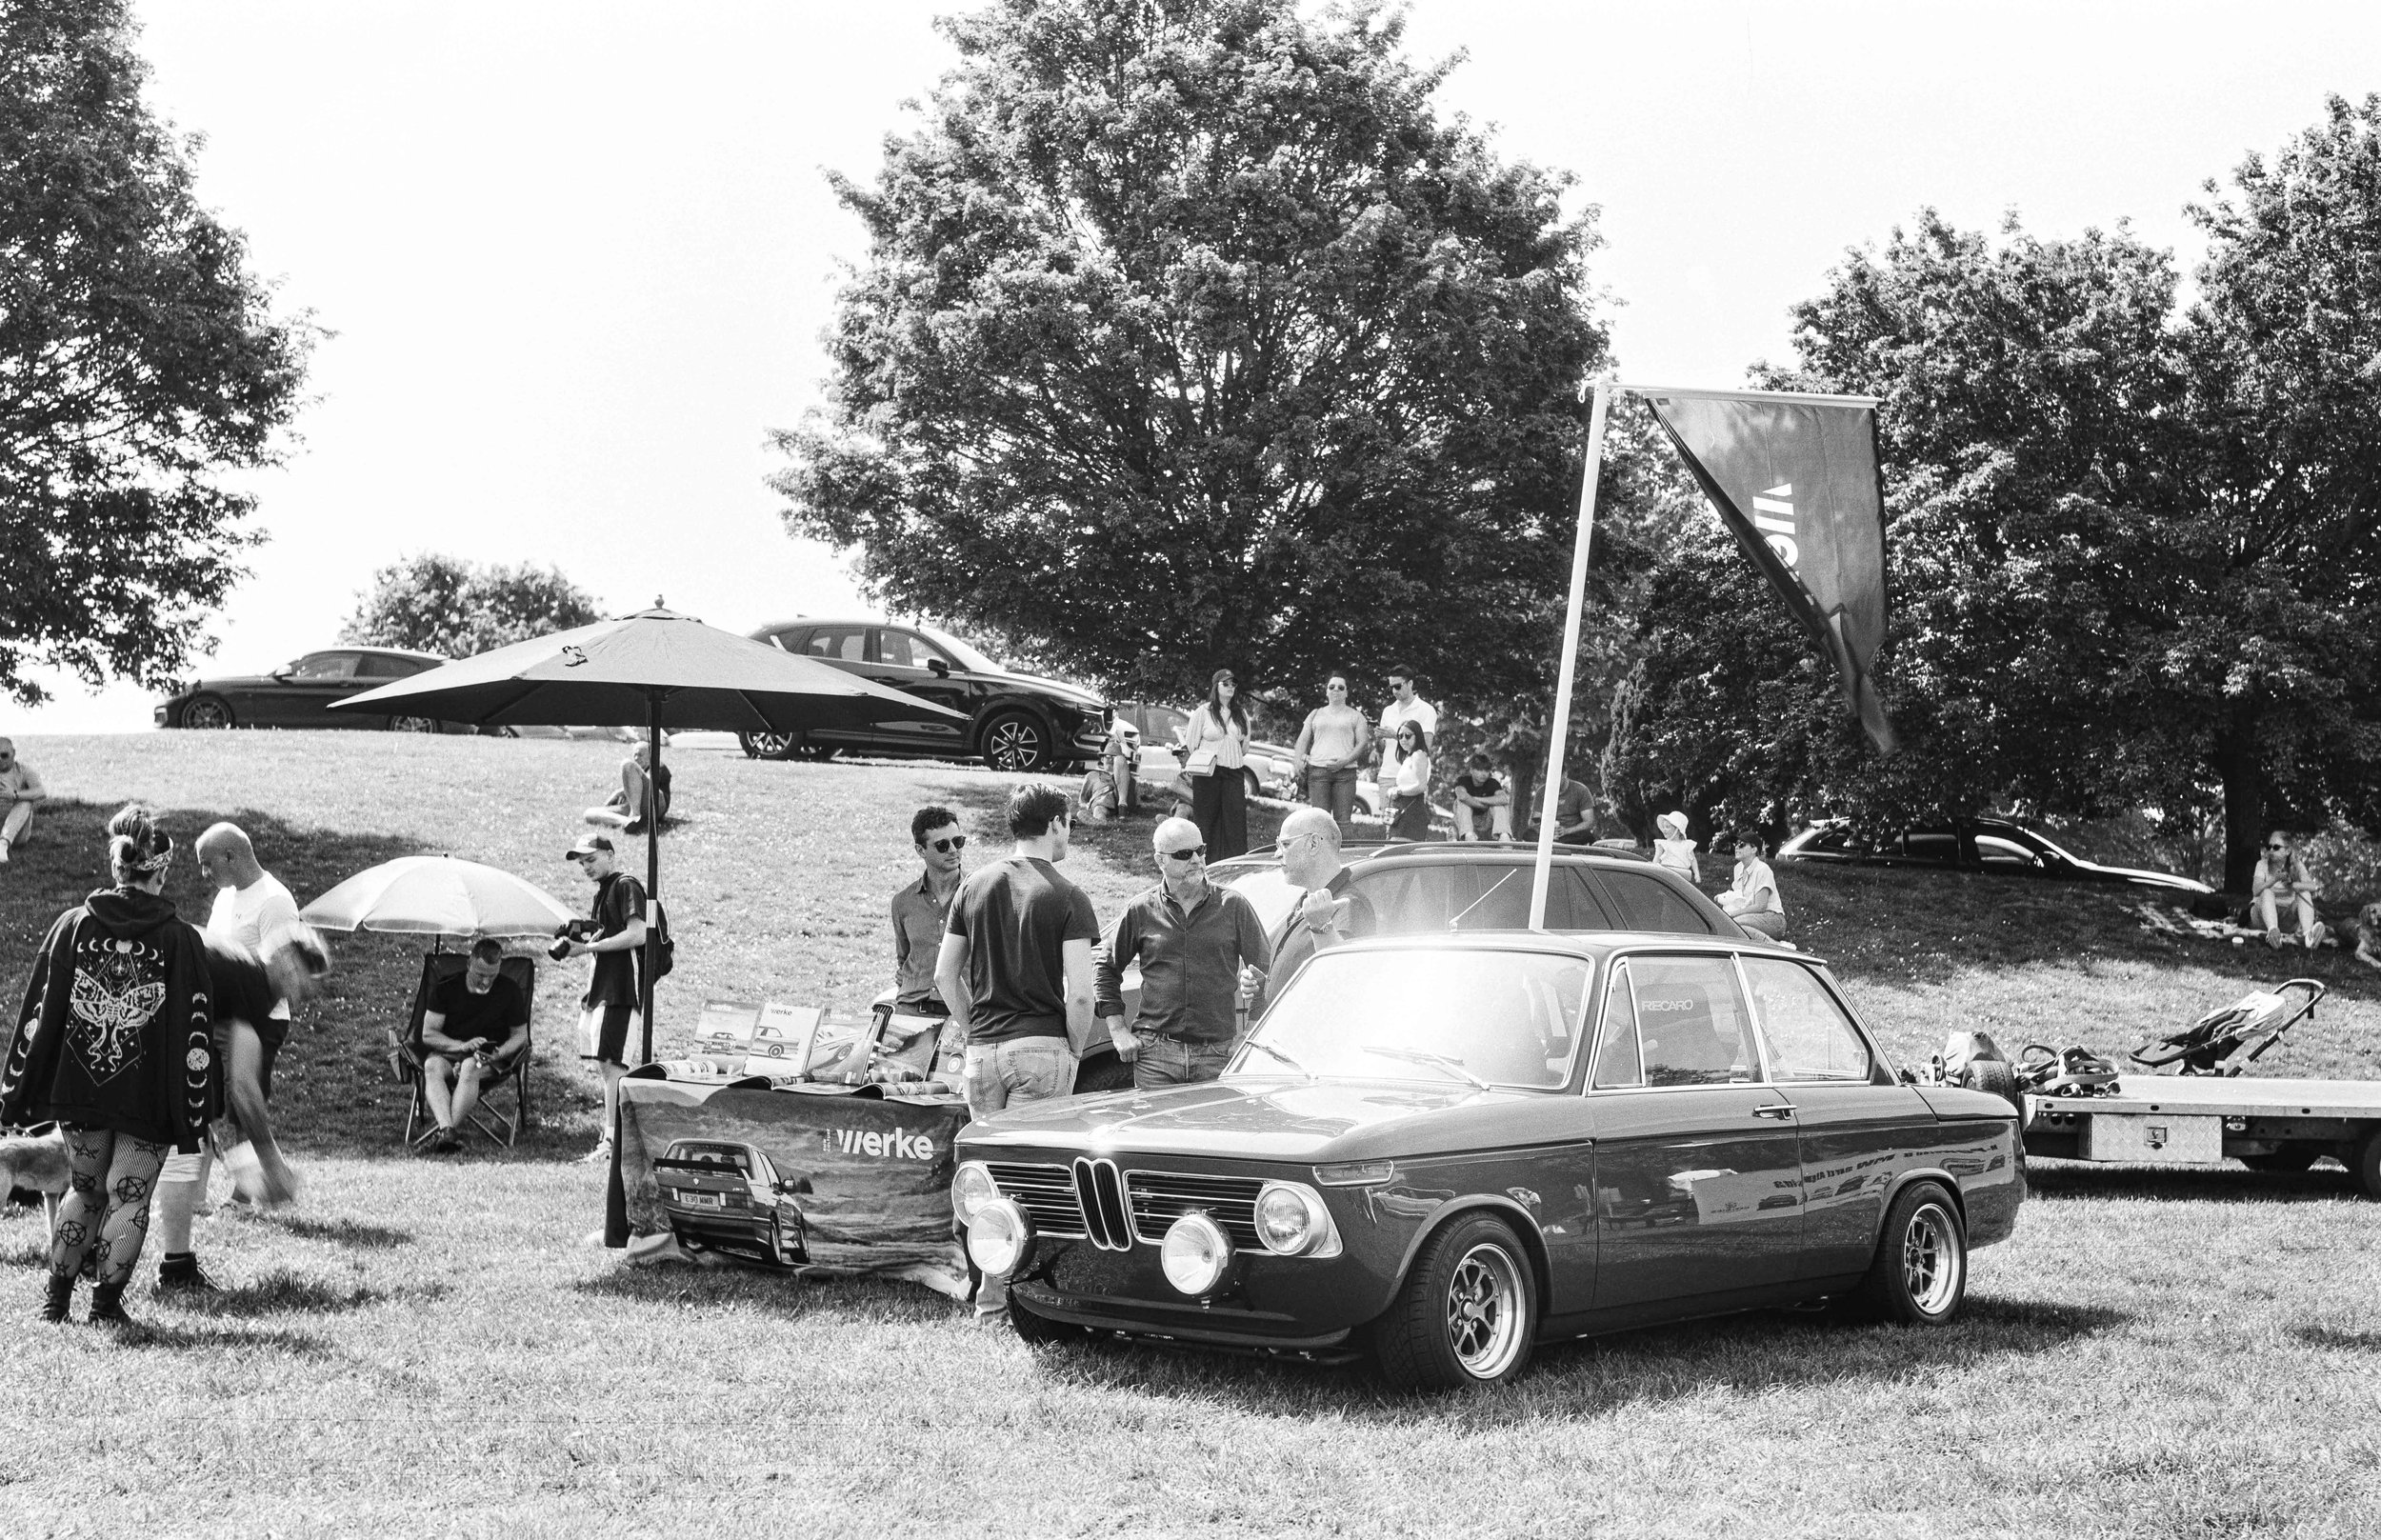
As this camera was made in Munich I’ve had fun photographing old BMWs that were also made in Munich. 1/20s 105mm F11 Lomography Potsdam 100.

Sometimes it’s just easier to put this camera on a tripod to maximise the image quality with a low ISO film and a small aperture. 1/5s 105mm F22 Ilford Pan F+.
Conclusion
I have very mixed emotions about this camera, but I think that comes down to my initial expectations of what I wanted it for, handheld shooting. Unfortunately, it hasn’t quite lived up to what I wanted it to be, even with the better Solinar lens, but that doesn’t mean it isn’t a good camera. I think of all the cameras I’ve owned; this has been the trickiest to master, but there is also great fun to be had in doing that. I don’t regret paying extra for the Solinar, I just need to spend more time working out how to get the most out of it. But for most people getting the cheaper Apotar is the way to go, stopped down at F11 and beyond the difference in image quality is not that great and being able to completely bypass the double exposure mechanism will not only save a few headaches but also give you the option to do double exposures if that’s something you want to experiment with.

Not the ideal camera for wildlife photography but some animals are tame enough to get in close. 1/100s 105mm F5.6 Kodak Tri-X.

A view down the Thames from The Monument. I would advise against shooting subjects at infinity at an aperture larger than F8.0. 1/100s 105mm F8.0 Kodak Tri-X.
Admittedly we don’t buy old film cameras to take the sharpest possible images in the world, but just bear in mind that every wasted frame with this camera isn’t cheap. If you just want a more point and shoot camera then pick up something else, whether that’s 35mm or a smaller medium format like 6x4.5. But if you fancy a bit of a challenge or sick to death of carrying heavy gear when photographing landscapes, then perhaps this is the camera for you.

An abstract shot taken of a new carpark. This camera has a steeper learning curve than many others but you can take fantastic images when you get it right. 1/100s 105mm F16 Kodak Tri-X.
If you enjoyed this blog then please consider leaving a tip below.